Victorian London - Publications - Etiquette and Household Advice Manuals -
Cassells Household Guide, New and Revised Edition (4 Vol.) c.1880s [no date]
- Children's Dress (1) - Clothing for Infants - (2) - (3) - (4) - (5)
Children's Clothing - (6) - (7)
[-back to main menu-]
Volume 1
[-33-]
CHILDREN'S DRESS.- I.
CLOTHING FOR INFANTS.
ALMOST any amount of money may be spent on the decoration of the various
articles of an infant's clothing. Embroidery and lace are both lavishly used,
and the finest materials are purchased by many mothers who are rich enough to
pay for their fancies in this respect. We would advise the young mother to avoid
needless display, even though able to afford it. All purchases should be made at
a good shop, where the articles sold may be relied on. All ostentation is
vulgar, besides which babies are sufficiently attractive to need little
adornment; and there is more elegance in simplicity.

The clothing absolutely necessary for a baby may be
supplied at a small cost if the mother be able to make up the materials at home,
and so save the cost of the making.
Materials.-Purchase an easy-fitting thimble of steel, lined
with silver; it is well worth what it will cost. Have two good pairs of
scissors - one pair of large ones, worth about three shillings, and a fine
embroidery pair that will cost 1s. 6d. It is always a good plan to have an old
or common pair kept where any one can have free access to them, because this
saves good scissors. Be very careful to have good needles and cotton;
sewing-machine cotton is the best made. Always have a lead pencil - an HB is the
most useful - and a penknife in the work-basket. One of those covered baskets
that stand on legs is the most useful to hold work, and costs four or five
shillings. A large work-basket to hold materials is also needed. Procure fine
cotton [-34-] and fine needles for babies' work;
needles Nos. 8 and 9 should be used, and the best cotton, in about three sizes.
An emery cushion is also useful. Do not commence work without a good leaden
pin-cushion, a yard measure, and plenty of pins. If you employ a machine, the
cotton used will be finer than that quoted, which is suitable for hand-work.
We are aware that there exists amongst some ladies an
unfounded prejudice against the use of the machine for under-clothing,
especially for that of babies. But exquisite work can be done with the better
class of machines; quite suitable for the work in question, on account of the
very fine cotton used in them.
We wil1 commence with a list of articles required for the
baby's outfit:-
| 6 Night dresses |
4 Long petticoats |
| 6 Day ditto |
6 Bibs |
| 24 Diapers |
1 Cloak |
| 4 Long flannels |
1 Hood |
| 4 Flannel squares (pilches) |
1 Coarse flan. nursing apron |
| 2 Common head-flannels |
6 Soft towels |
| 1 Best ditto |
3 Pairs woollen boots |
| 1 Large flannel shawl |
Binders |
| 3 Robes |
2 Sponges, large and soft, small |
| 2 Macintosh pilches |
|
| 4 Plain frocks |
1 Powder box and puff |
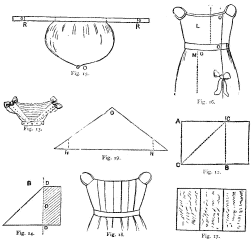
To Cut and Make a Baby's Chemise.-Half a dozen
little chemises are the first requisites for an infant's toilette, to make which
it will be necessary to purchase a yard and three-quarters of lawn at 1s. 6d. a
yard; the lawn should measure twenty-eight inches wide. Cut this up in six
lengths of ten inches each. To cut the material accurately, measure ten inches
on each side with a yard measure, put a pin at each place, fold the stuff
across, and crease it quite flat ; pin it to a leaden pin-cushion. Take one of
the ten-inch strips to make the first chemise, and fold it in three -see Fig. 1.
The folds C C should be cut for the arm-holes, and at A A and B B shorter
cuttings should be made for the shoulder-straps. Fig. 2 shows the flaps of the
back and front turned down. The corners B and C should be put together-run and
felled-preparatory to the insertion of the sleeve. Fig. 3 represents merely an
oblong strip. When the corner, marked 2, is turned down, and the other end,
marked 1, is brought round and sewed to it, a gusset is formed. The latter
should not be cut out in the piece when making any chemise, as it never wears
well ; and to make a separate gusset is to lose much time without any advantage.
The corners between the sleeves and flaps of the garment should be button-holed.
Next turn a very fine hem down for the edge of the sleeves; afterwards hem the
bottom of the little garment rather deeper. The selvage for the sides may be
left. The points of the sleeves are armed with straps, and fine linen buttons
are placed midway on the shoulders. These are used when the child is older, to
button down the flannel straps, and need not be added till required.
Those who can afford it use French cambric for babies'
chemises, and should then edge the sleeves with very narrow Valenciennes lace;
while those who use lawn may trim them with Cash's frilling, which is
inexpensive.
The Night Flannel- Next to the chemise a flannel is worn. This
should be Saxony, and measure not less than forty or forty-four inches wide. It
may be purchased for 1s. 6d. a yard, unless a higher-priced one be desired. Two
yards must be purchased to make two flannels. Mark the centre of the flannel,
and form a box-plait there an inch and a half wide, or two inches in the wider
flannel (the forty-four inch). Make two other similar plaits on each 6ide of
this-five plaits in all-with fully an inch of space between each, and about four
inches over at each end. Tack these plaits down for seven inches to form a body,
and let the rest hang free; cut out two half-circlets between the two outer
plaits each side, to form the arm-hole, as shown in Fig.4. at M and M. Run the
plaits very neatly down each side, and stitch them across at the ends marked by
the letter N. Stitch a washable binding all round the flannel, and add two tapes
for, shoulder-straps, marked O, and tapes each side at the places marked
P, to tie the flannel, which folds across the baby.
For a Day Flannel-Purchase two yards more of better
quality flannel, say 2s. 6d. or 3s. per yard. Make as before directed. Some
persons give as much as 4s. or 5s. a yard for perfectly white flannel; bind it
with white linen-binding, and tie it down the front with sarcenet bows. The
plaits are either quilted across with white or coloured silk, or sewn down with
chain-stitch. Fig. 5 represents parts of two folds of a baby's flannel, the one
quilted, the other chain-stitched. Chain-stitches are formed by leaving the loop
of the first thread above the work, and entering the needle of the second stitch
through it, as shown in Fig. 6.
The First Gowns.- These are made half high, and with long
sleeves. Buy twelve yards of fine dimity, almost like piqué, and make
six of them. Cut off two lengths of a yard each, and run and fell them together
till they look like a sack with two seams, Fig. 7. Leave these seams open (U U,
Fig. 7) for the sleeves to be put in; slope off pieces at V V, as shown in the
illustration, to form the shoulders, which should measure about two inches long.
Run and fell these together. Either merely hem the top and run a string in it,
or gather it into a band, which must, however, also have a string in it to draw
it close to the baby's little neck. Gather in the skirt from X to X to form a
waist. The piece gathered should be fifteen inches long, and brought into a band
one inch deep and five long, as shown in Fig. 8, at Q. One end at each side of
this band (R R) ties round the back of the waist, and draws the loose part of
the robe close to the baby's figure. A placket hole is made five inches long,
down the back of the body. The robe is not really open at the back; it is only
drawn like this in the diagram to show the looseness of the back, and how far
the waist gathers extend. The seams come at the sides. The sleeve is of the coat
shape, cut like Fig. 9; it is run and felled together, the seam being placed
downwards at Y in Fig. 7. The Z marked in the diagram of the sleeve, Fig. 9,
shows how the top is rounded to sew it into the arm-hole. It is run and felled
in, and eased a little at the top; the arm-hole should not be quite so large as
the sleeve. The baby's sleeve is eight inches long, such across the top before
it is joined, and five at the cuff. The measurements are all given allowing for
turnings, hems, &c.
A pretty First Frock (Fig. 10) is made of fine cambric muslin ;
three rows of insertion embroidery, edged each side by narrow pointed work, trim
the body. The cuffs and epaulettes are enriched to correspond, and the necks and
waistband are also of fancy work. The skirt is embellished with a number of
narrow tucks, and edged with pointed embroidery.
A Handsome Day Flannel.-Fig. 11 gives a design, for a handsome
day flannel. It is made of very fine white Saxony. The body plaits are
machine-quilted, with white crochet-silk. The skirt has a deep hem, also
quilted. It is bound with broad white ribbon, and tied with large bows.
In our next article we propose giving another pattern for a
baby's flannel, a baby's house wrapper, a baby's cloak, cape, and hood, with
ample directions for cutting them out and making them up, as in the case of the
garments described in the present paper.
[-88-]
CHILDREN'S DRESS.-II.
CLOTHING FOR INFANTS (continued from p. 34).
CHANGES in fashion affect the clothing of infants less often than the
toilettes of the more mature. The greatest alteration that has been made for
some time regards the length of the little ones' dress. Robes that once reached
absurd proportions are curtailed to the length of a yard and the yard may even
include the bodice. Of course, the petticoats and flannels are all shorter in
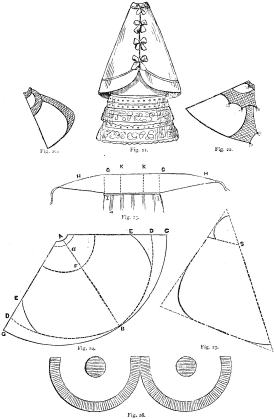
proportion. Another way of making the baby's flannel is shown in Fig. 18,
which represents the back of the little garment, and Fig. 16, which displays the
front. The back has either three or four box-plaits in one with the back
breadth of the skirt. The front of the bodice is made of two plain pieces wide
enough to wrap over one another, and joined by a band (which also goes over the
plaits behind) to the skirt in front, which wraps over and ties on one side. The
dotted line L shows how far the body of the flannel folds over on the
under side. M shows where the under skirt ends, and is buttoned to the upper
one. The third way of making a flannel, very suitable for summer, is given in
Fig. 23. A strip of flannel six inches deep and fourteen inches long, from G to
G, is cut away to points each side, H and H. This is bound all round. The skirt
is plaited and set on from I to I. There are semi- circles for armholes cut, and
tape straps added at K and K. The dotted lines show the portions meant for the
back, and to wrap over in front. The points are folded round the baby's body,
and tied by strings sewn on at H and H.
Another necessary item will be 24 yards of good linen diaper, a yard wide.
It will cost about one shilling and sixpence a yard. Cut 24 squares from this,
hem them round, and fold four times. For a pilch to wear over the squares, take
a square of Welsh flannel, fold it shawl-shape, and cut it in half. Take off the
two shawl ends, marked by the dotted lines N and N in Fig. 19, and
gather it into a band, as in Fig. 15, about fifteen inches long. Button it at R
and R, and add a loop at O also to fasten on to the buttons at R. Macintosh for
extra-secure pilches can be bought by the yard.
The House Cloak or Flannel Shawl.- A yard of flannel
twenty-seven or twenty-eight inches wide will be required. This must be shaped
to an exact square of twenty-eight inches. To cut a square of anything always
fold your material across, as shown in Fig. 12, bringing the material where it
is cut across equally to the selvage at B. The fold comes at the dotted line C
C, and when folded the material resembles Fig. 14. Cut it off at the dotted line
D D D, you then have a square exact. To cut the baby's wrapper, keep your
square folded, as shown in Fig. 14, and cut it out as shown in the plain line in
Fig. 25, the dotted line indicating the folded square. To ornament the flannel,
work it all round the edge in scallops with blue or scarlet crochet silk, and
work a dot in every scallop. To scallop the edge cut a card out, like Fig. 26,
cutting holes for the rounds. This can be done by tracing the outline on the
card first. Then with a red chalk pencil mark the scallops and holes all along
the edge of the flannel. Run them over with cotton, afterwards button-hole the
edge in silk, and work the large dots in satin stitch. On the wrong side of the
flannel square, at the dotted line marked s, in Fig. 25, put on a ribbon case,
and run in a string to draw the hood round the baby's neck. This flannel square
is worn over the dress in the house during the month; and afterwards when the
child is carried from room to room.
The common head flannels should be rather more than a yard square.
The Baby's Cloak.-It has been very usual lately, and more
fashionable, to drape a baby in a simple deep circular cape out of doors, in
preference to the old cloak with its cape. There is no essential difference in
the pattern needed. The cape is merely a cloak without its second cape, and with
the trimming differently arranged. If a young mother have not a pattern for the
purpose she can easily make one herself. In the first place, let her take one or
two old newspapers, and tack three of them together neatly with needle and
thread, as shown in Fig. 17. The centre of these united papers must be
ascertained by doubling them. Then spread them out upon a table that has a cloth
upon it. Pin the end of a yard measure securely to the centre, through the cloth
at the top of the paper. Then take hold of it where the figures thirty-six
denote the yard, and move it from end to end of the paper, holding a pencil in
the same hand to mark its movements. The yard measure is pinned at A in Fig. 24,
and moves from B to G at the other end, the thirty-six inches, or yard, marked
on the tape, and then again from B to C. The line in the centre, it will be
observed, is exactly straight, being rendered so by folding the paper after the
circular line is made. Having marked the half circle thus described with a
pencil, allow it at the line C and G, each side of the centre B, five
inches shorter, according to the dotted line D D. Pencil this nicely off as
shown in the illustration. Now [-89-] cut out the
pattern with scissors ; fold it together, and give the corners the little slope
or curve marked at E and E.
When a cloak is to be made it is cut just the same, but a cape is formed
two-thirds of the size, at the dotted line marked F, and a collar at that marked
a. For a baby's circular cape a collar is added, but the trimming is put
on the neck like a collar, and of the same shape. Both cloaks should measure in
the longest part, that is, from the neck to the edge in the centre of the back,
not more than one yard ; a circular cape rather less. Having obtained an
accurate pattern it is easy to cut the material. Two yards of cashmere at 3s.
6d. or 4s. a yard is required. White is the most esteemed, and scarlet the
most durable, of colours. Cashmere washes well, and can be dyed so as to look
like new. A very pretty circular cape can be made of white cashmere, trimmed
with bright, light blue llama. A design for this is given in Fig. 21. The llama
is put on broadly ; it must be cut to the curved shape of the cloak, and joined
in breadths ; it encircles the lower edge, and is rounded off towards the front.
Up the front several handsome blue ribbon bows are sewn on, and the cloaks
secured beneath them by hooks and eyes. The llama should be tacked on flat after
the breadths are joined, and very fine cotton should be used for the purpose.
Turn in the tipper edge, and sew it down with a narrow white silk braid. A
handsome cloak may be lined throughout with white sarcenet; but it is very
general, and far less costly, to use fine white cambric for the purpose. Having
tacked on the blue trimming, and neatly run it into the braid at the edge, put
the lining upon the cloak face to face, and tack it round, leaving the outside
of both visible. Run it nicely together at the edge, and then turn it inside
out, so that the right side of the cloak is outwards. A trimming, like a collar,
of the blue has, of course, been placed on the cape as well as the broad edge.
Add the bows, and the cloak is complete. It is very easily made. The trimming
may be of silk instead of llama, and quilted instead of plain; no braid is then
needed.
In cutting the newspaper pattern, we should call the reader's attention to
the fact that it must be doubled after cutting to see that both sides are alike.
indeed, it will be as well to cut it in half from A to B at the dotted line down
the centre. The cashmere is cut in two pieces, the seam coming down the back of
the cloak, unless it be wide enough to get the whole cloak without a seam. Pin
the pattern thoroughly on the material; double before cutting.
To make a cloak, as before named, the same directions must be followed, and
the cape and collar cut on a similar plan, but smaller. The cloak is trimmed
down the front, as shown in Fig. 20, the trimming becoming wider, and rounded
off at the end. The cape is ornamented all round ,and so is the collar. The
cloak may be of white, grey, scarlet, crimson, or blue cashmere, and the
trimming of sarcenet, either white or of the same colour as the cloak, lined
with a little wadding, and quilted. The wadding is tacked to the silk, and the
quilting done, the silk being shaped and the breadths joined before it is
applied to the cloak. In using a sewing-machine keep the wadding uppermost.
Fig. 22 offers a pretty design for a baby's cloak; the edges scalloped and
pointed, and trimmed with a small tassel at every point.
it is decidedly best to buy the baby's hood. The cap worn under the hood is
a caul with a full lace edge. The lace must be removed to wash it, and requilted
each time. A boy's hood is distinguished from a girl's by a rosette. A hood as
soft as possible is a better covering for a baby than any fancy kind of hat,
however pretty it may look. The stiffness of a hat is unsuited to the tender
softness of a baby's head; neither is it any protection to the child. Caps are
only worn under hoods, and not indoors.
In Fig. 21, under the cloak, a pretty design is given for a handsome frock.
It is made with two flounces and [-90-] work
between; one row over the first flounce, and two over the second. The flounces
may be worked, or of plain fine muslin edged with work or lace. Fig. 13 is a
design for a body to wear with this skirt. The braces match the flounces. The
stomacher is embroidered; and bows tie the shoulders.
A few words on the art of embroidering cashmere, French merino, or flannel,
will doubtless be found most useful to many young mothers. I have spoken of
tracing the scallops for the edges with a red chalk-pencil ; this, however, is
only suited to an unskilled worker. There are two methods of tracing-pouncing,
and the use of carbonised paper. The last is the easiest way; but care must be
taken, as the black of the paper may soil the material. It should be well rubbed
with bread before use, and the effect tried on something first. Draw the design
on paper ; between it and the material to be worked place the black
tracing-paper, carefully pinning them in position together; then, with a
knitting-needle or very hard lead-pencil, follow out the design, as if sketching
it afresh, line by line. Carbonised tracing- paper can be obtained in sheets of
any stationer who keeps drawing materials ; and, if preferred, blue, red, green,
or white tracing-paper can be substituted for the black. Patterns used for
open-work embroidery can be adapted as borders, and worked in satin-stitch, the
edges being button-holed. Floss, or ordinary embroidery silk is used for
cashmere, but wool, or what is called linen-floss, is better for flannel than
silk, which sometimes turns yellow when washed.
[-116-]
CHILDREN'S DRESS.-III.
CLOTHING FOR INFANTS (continued from p. 90).
WE
promised in our last paper to lay before our readers practical directions for
making babies' long frocks and petticoats. These are not worn so long in the
skirt as they were formerly. For full-dress toilette far a baby the skirt of the
robe, however, is still very long; and as the body, including the band, is two
and a half inches deeper than the old-fashioned-ones, the difference in the
length is not very great. The length of the skirt of a robe thirty or forty
years ago was forty inches, and the body three inches. A full-dress robe is now
made thirty-six inches long in the skirt, and five and a half in the body. Very
pretty robes may be bought ready-made for about 14s. or 15s. They should be made
of fine Nainsook, at about 2s. 6d. or 3s. a yard ; according to the width. It
will be the best plan for the young mother to commence by making the petticoats
before she attempts the frocks, by which arrangement she will get her hand
accustomed to the work.
Four white petticoats, and four plain frocks, with three handsomer for best,
will be sufficient; but where means allow of frequent change double the number
can be made and the every-day frocks embroidered also. For the petticoats, a
fine, thin, soft long-cloth should be chosen, and will cost 9d. or a 1s. a yard.
Eleven yards will be sufficient for petticoats ; a very wide material is not
needed. Procure also two pieces of tape, one a quarter of an inch, the other
three-eighths of an inch wide. Undressed long-cloth should be procured. It can
always be had by inquiring for it at a really good shop. The thrifty housewife
will find that she saves ten or twenty per cent. by going to a large,
well-established shop, and the trouble and fatigue of a long walk, or the
expense of an omnibus will be amply repaid. When a lady has to go a distance to
a shop she should try and make all the purchases needed at once, which may
easily be done by keeping a little memorandum-book, and jotting down from time
to time the articles required. The petticoat may be made in two ways. First, the
simplest - cut off nine breadths, of thirty-four inches each. Split three of
these in half lengthways, to make half breadths. Each skirt consists of a
breadth and a half.
If the material be undressed, soaking alone is necessary. Rubbing between the
hands, or soaping the work with dry soap, is sometimes sufficient preparation if
dressed. It should always be soaped for the sewing-machine. Any dress in the
material clogs the teeth of the feeder and impedes the motion. If the work be
soaked it should be ironed whilst damp, and made very smooth, otherwise it is a
not easy to work evenly upon it. Where the selvedges come the breadth and
half-breadth of the skirt need only be run together neatly. The other seam must
be run and felled.
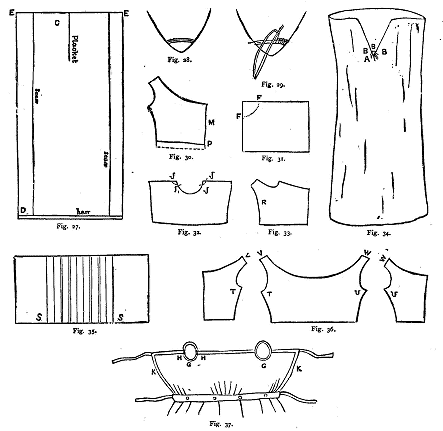
Make a cut down the centre of the half-breadth, seven
[-117-]
and a half inches long, as shown at C in Fig. 27, and hem it round with
the narrowest hem that can be turned down, neatly button-hole stitching the
angle A, Fig. 34, and then making a loop across, shown at B B B. In case any of
our readers are not acquainted with the correct mode of making a loop, we will
describe it in detail with the help of the diagram, Fig. 28. Pass the cotton
across from side to side two or three times, taking an imperceptible stitch
through the material, and keeping the three bars of cotton close together and as
much like one as possible. Then work over them closely in button-hole, stitch,
as shown in Fig. 29. The object of this loop is to prevent the placket-hole from
tearing down, and it must be made to all the frocks as well as the petticoats.
Next hem round the skirt, as shown at D in Fig. 27, and then gather it finely at
the top (E and E) all round. Gathering is simply running, and drawing up the
thread.
It will be necessary to use rather coarse cotton for this purpose, because a
fine thread is always exceedingly liable to break in the drawing. However the
body is made, the skirt is always constructed in the same way. To make the
simple body, Fig. 34, cut a strip of long-cloth five inches wide and twenty-six
long. Fold it in four, and hollow out a piece for the arms, as shown in Fig. 31
by the dotted line between F and F. How these arm-holes look when the piece of
long-cloth is opened-up maybe seen by referring to the diagram of the completed
body (Fig. 37) at G and G. Cut two little strips of long-cloth (cutting down
the stuff, not across), each four inches long and one inch and the sixteenth of
an inch wide. These are to form shoulder- straps, run and felled on at H and H
in Fig. 37, having just nipped off the corners with the scissors, as shown at J
J in Fig. 32, treating both arm-holes alike. Then hem all round the arm-hole,
and inside the shoulder-strap, making the hem no wider than the sixteenth of an
inch, which is the smallest division you will find marked on an English
yard-measure [The French, who are much neater workers, preciser copyists, and
better fitters, divide their inches into
[-118-] thirty parts.] Then hem the backs (K and K in Fig. 37) a 24
quarter of an inch deep. Next hem all along the top, shoulder-straps included, a
quarter of an inch deep, and run the narrowest tape in for a band. Cut two
strips of long-cloth (down the material) half an inch wide and nineteen inches
long. Gather the waist of the body a little at each side of the back and in the
centre of the front, as shown in Fig. 37, the limit of the gathers marked by
four O's. Measure the strips just cut exactly, and run it to the body on the
wrong side, and turn it over. Join the other end of the band to the gathers of
the skirt. The second band strip is used to line this, turning it down at both
edges, and hemming it on the wrong side, taking care not to let the stitches
show through on the right side. This completes the petticoat.
The second or cheaper petticoat bodice is made like a dress body, and the
same illustration will serve for both. Take a piece of long-cloth six and a half
inches wide and thirteen inches long, double it exactly in half, the short way,
and cut out the front of the bodice like Fig. 30, the fold coming in the centre,
at M. Pencil the shape on the stuff, before cutting it out, into a one inch wide
band, marked at P, which is put on afterwards, and with ends. Next take
long-cloth eight inches wide and fourteen long, double it the narrow way, the
fold at a, and cut it the shape illustrated by Fig. 33, afterwards cut it in
half at R, as the back is in two pieces. The two back pieces and the front will
resemble Fig. 36. Join the pieces together, T to T, running and felling the seam
from the arm-hole to the waist. Do the same at the other side, at U and U. Then
also run and fell the shoulders, V to V and w to W. Cut a strip band half an
inch wide, and turn it down to make a narrow false hem round the top, in which a
tape must be run. Hem the arm-hole, and let the waist into a band. A petticoat
bodice needs no sleeves. Whip the skirt instead of gathering it, and sew it to
the bodice when the bodice itself is quite completed. Whipping is done by
rolling the edge of the calico very finely between the fingers, and sewing over
the roll in rather long stitches, but such as will draw up into fine gathers.
The rolling is done piece by piece as you sew it along. It gives less trouble to
turn down about a quarter of an inch of the material, instead of rolling it, but
it is less neat. Some persons stroke the gathers down with the point of the
needle, which gives a regular appearance, but it is better not to do this to
fine muslin, because it helps to wear out the fabric.
We have already recommended fine dimity for the six gowns of the Layette;
but they can be made of plain cambric muslin, at 1s. 6d. a yard. About three
yards will be wanted for each frock. There are two breadths in each skirt, a
yard and a quarter long, the body is nearly a quarter of a yard deep, and the
sleeves and band cut into another quarter width-ways. Eighteen yards will
therefore be wanted for six frocks. The addition of embroidery is entirely
optional, except round the top and sleeves, where a little fancy work cannot be
dispensed with. The embroidery used for the purpose should be very narrow. A
simple scallop and dot is pretty enough.
To make the skirt, cut two breadths (these should not be less and need not
be more than twenty-six inches wide), each breadth a yard and a quarter long.
Run and fell them together with as narrow a turning as possible, and very fine
cotton and small stitches. Hem the bottom, and reduce the length of the skirt to
thirty-six inches (that is, a yard) by making a number of tucks. The hem must be
of the same width as the tucks.
There are different ways of tucking the skirts, which give variety to the
plainest frocks. We will describe two or three ways. First, a half-inch wide
hem, and a number of half-inch wide tucks, each half an inch apart. Second,
half-inch hem and half-inch tucks, each one inch apart. ~ Third, half-inch hem
and one tuck, half an inch apart.
Leave two inches, and make two more tucks, half an inch apart. Leave two
inches again, and repeat, making the tucks in the same way till you have
sufficient. Fourth, a number of tucks the sixteenth of an inch wide, with the
same space between each, and the hem to correspond. Fifth, a hem and two tucks
the sixteenth of an inch wide, and the same space between ; miss half an inch,
three tucks again; miss another half-inch, and repeat once more. Either of these
patterns will look well with a single row of embroidery added at the bottom, but
it is not necessary. Wide tucks may also be run in threes, with a wide space
between. Sixth, an inch wide hem three quarter-inch tucks, each a quarter of an
inch apart. Miss an inch, and make an inch wide tuck and three quarter-inch
ones, a quarter of an inch apart. Repeat the tucking once or twice more in the
same way.
A plain body can be made with tucks to correspond, perpendicularly down the
body. To make a tucked body, a piece of muslin eight inches wide and the whole
length of the material should be cut and tucked across, commencing the tucks
three inches from the end; when the tucked piece measures four and a half inches
from S to S in Fig. 35, allow three more inches, and cut it off. This piece
resembles Fig. 35. Fold it in the centre, and carefully pin it together; then
pencil and afterwards cut it to the shape of Fig. 30, having the folded part at
M. The back should be made quite plain, and cut in two pieces, like Fig. 33 ;
join it in the same way at the sides and shoulders, as shown in Fig. 36. Set the
top into a quarter-wide band, the. front of embroidery, or worked with dots or
corals, which we will presently describe. The band for the top is made in two
pieces; cut each half an inch wide, and allow for turning in. First run the
embroidery to the band; -then lay the body on the table, the right side up,
towards you. Put the band on it, the wrong side upwards, so that the right side
of the band lays face to face with the right side of the body, as shown in Fig.
45, where the tucks on the wrong side of the band can be seen. Pin it, and run
it to the top of the body, then turn it up, and you have the right side of both
facing you. Line the band by running on the second strip of muslin. Run a tape
in. Let the waist into an inch-wide band, made of embroidery or worked with
coral or dots. The sleeve is cut on the cross, like Fig. 46, nine inches long
and three and a half wide. Y Y is the piece for the hem, which is made after it
has been run and felled together at Z Z. Run and fell it into the
arm-hole. The skirt must have a placket-hole made, and be drawn into gathers in
the same way as the petticoat, and then sewn to the body. Fig. 41 shows a plain
frock completed- the neck, waist, and sleeve edges set in bands worked with
dots.
To Work the Dots.-Fill a needle with rather coarse embroidery
cotton; commence with a stitch, just as if you were about stitching a waistband.
You have inserted your needle in the stuff thus - but do not draw it through -
leave it so, as shown in Fig. 40; twist the cotton round it, close up to where
it comes out of the stuff (the place is marked by the letter A); twist it a
second time in the same way. Draw the needle through; if the worsted cotton be
not close up to the stuff pull the thread, and set it with your fingers. Take a
second stitch through the very same holes - B and A - and the dot is formed.
When dots of graduated sizes are required, take a small stitch, and twist the
cotton once, for the first size; a larger stitch, and twist the cotton twice,
for the second; a still larger, and twist it thrice, for a larger dot. Two
stitches taken in the same place (from B to A) raise the work still more.
Coral Stitch.-Coral stitch is much used on the joins of
embroidery insertions. It should be worked downwards, the thumb of the left band
keeping down the thread while the needle is inserted slant-wise above the
thread, [-119-] and so drawn through; taking the
stitches alternately on the right and left.
Herringbone Stitch (Fig. 47) need scarcely be explained; we need
only to remind our readers that it is very suitable for embroidering babies'
shawls and flannels.
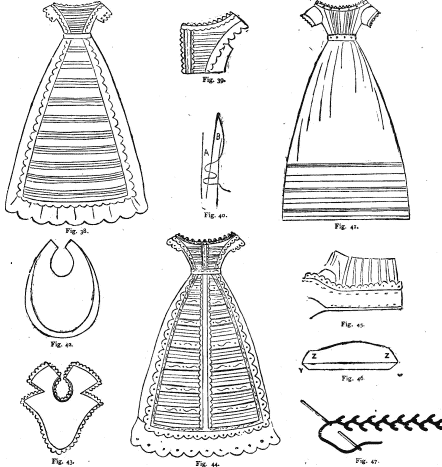
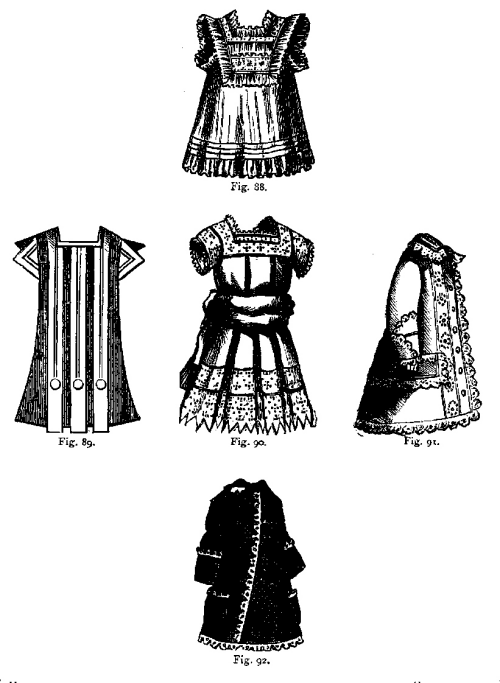
A Pretty Baby's Robe (Fig. 38).-A very pretty baby's robe may be
made with the help of the sewing machine, with a front en tablier. A very
fine muslin should be chosen. for this purpose. The tucks will require a breadth
about two yards long. It is best to work the tucks before cutting the material,
as if there is any variation in the width, the length will not be exact. First
leave five inches the sixteenth of an inch wide, and work a similar one between.
Miss two inches, and repeat till the work is a yard long. Then cut it off. This
tucked piece must be gored on both sides. Fold it in the middle and pin it well
together and cut both sides together. The half width as it lies doubled must be
gored off to five inches across the top. It is better also not to let it measure
more than fourteen inches at the bottom. The five inches left are to come at the
bottom, one of which is allowed for the hem. Join a plain width to this to make
the skirt; but before joining, run down each side of the gored breadth a piece
of embroidery-simply a scalloped edge-carry it also across the bottom of the
skirt just below the tucks, marked A to A in Fig. 38. When the skirt is
completed, add a three and a half inch flounce, to be fluted all round the
bottom, the edge scalloped in button-hole stitch. For the body, tuck a straight
piece horizontally with small tucks close together, and cut it stomacher shape,
as shown in Fig. 39, inserting it into the remainder of the body, with a brace
of the scalloped muslin added each side, and straight round the back like a
berthe. The sleeves are made the same as Fig. 46, but over them is a frill of
the scallops. The waist and neck-band are slightly embroidered, and a simple
edging placed round the neck.
To obtain the stomacher pattern is not difficult; cut the bodice pattern,
Fig. 30, in paper, with a pencil mark off the line of the stomacher shown in
Fig. 39; cut the tucked piece stomacher-shape, and the side pieces form the
remaining portion of the pattern.
A Christening Robe (Fig. 44).-To make this dress, take half a
width of muslin and run tucks three and three with about four inches between
each. Cut them apart. In paper cut the pattern of the front of the robe, which
is to be a gore twenty-eight inches at the bottom and ten at the top. Cut the
half of it in paper, and allow three inches for the centre and outside
insertion. Between every three tucks place a row of insertion, laying each on
the paper pattern, so as to cut them the right length and not waste the
embroidery, which is expensive. Between every three tucks there must be a piece
of inch-wide embroidered Insertion. Cut both tucks and insertion a little longer
than the pattern to allow for working-up, then neatly join them. Down the centre
there is a row of embroidery bordered each side by edging, and this is repeated
at each side and carried round the bottom. A plain breadth of wide muslin
completes the skirt, which is bordered all round by an embroidered flounce four
inches deep. The body is composed of a stomacher of two tucks and one insertion,
placed alternately. An insertion, double edged, occupies the centre, and the
braces, which form a berthe behind, are of the flouncing embroidery that robes
the front of the skirt. The sleeves are plain, like Fig. 46; but covered with a
frill of the flouncing. The waist and mock-band are made of insertion, and a
narrow edge finishes the top. Christening robes for babes are sometimes made of
lace instead of embroidery; but of course this requires everything en suite
in richness and costliness, and is by no means necessary.
Bibs (Figs. 42 and 43) can be purchased for 8d. or tad. well quilted and
wadded. If made at home, cut it out in fine soft calico, and a coarser piece for
the lining. Thick flannel or cotton-wool should be placed between the calico and
lining, so as to absorb the moisture. Then quilt it, pipe it round, and sew on
edging.
[-177-]
CHILDREN'S DRESS.-IV.
CLOTHING FOR INFANTS (continued from p. 119).
Short-coating the Baby.-There are two important things
that never should be forgotten in dressing infants and children neither to load
them with clothes, nor to let them, on the other hand, be exposed to cold
insufficiently protected. With a young child, care to shield it from draughts
and to wrap it in a comfortable cloak, and not to expose it to inclement
weather, is most necessary. Overheating clothing weakens children, and by
causing profuse perspiration, predisposes them to take cold. Colds are the
commencement of all kinds of diseases, and sometimes establish a permanent
constitutional derangement.
Secondly, the clothes of babies and little children should never restrict them.
All strings and buttons should be loose; bodies, waists, and arm-holes roomy.
There must be no compressing ligatures anywhere. Boots, such as - we often see
adopted for babies, are unfit for them. The shoemaker produces a narrow case
that cramps up the little creature's toes, and deforms them it is tightly laced
up the middle, and cruelly confines the ankle, that actually swells round it,
often the occasion of weak joints and thick and unshapely limbs in after life.
Up to a year old, the little knitted sock all of soft wool is the best foot.
covering for the infant human being. After that, when the child begins to walk a
little, and toddles from chair to chair, a similar knitted sock, with a cork
sole to it, is all that is needed. As soon as It begins to get about on its feet
let it have little shoes-very small pieces of silk, merino, or llama will make a
baby's quilted shoes. Place a piece of thin flannel next the silk, and line with
cambric muslin; tack all together, and quilt it. Any shoemaker will cut the
mother a pattern for its shoe, and also a pair of cork or thin soft leather
soles for them. It is easy, and takes little time to make such a pair of shoes.
They must be bound with. ribbon round the top and straps have buttons on the
straps, and rosettes on the toes. Many ladies make such shoes for fancy bazaars.
When the child is carried out, a little pair of woollen gaiters, with soles,
must be drawn over the shoes and up the legs. When the baby begins to walk out
of doors, let it have easy black kid shoes with straps; these may be followed by
very loose cashmere.
[-178-] It is, generally speaking, an unthrifty
plan for a young mother to cut up her baby's long robing and underskirts to
short-coat it. If her family increase, these long garments will be ready for new
visitors, and it only takes two thirds of the material to make the little frocks
and petticoats afterwards, it is one comfort, where economy is needed, to know
that the expense of clothing the first baby will cover the cost of two, or even
three more and the first trouble, too, will be sufficient for all ; and only a
few renewals will be wanted in the wardrobe. The expediency of keeping the
flannels is doubtful, because new flannel is better than old for this purpose.
There is a better way of making babies' flannels than either of those we
have yet given; but many mothers object to the pleated flannel body as too warm
and weakening for the infant. The body is a plain piece, fifteen inches long and
eight wide; double it in half the narrow way at A A, Fig. 55, and cut out the
half circles for arm-holes at B B. Bind it all round with white ribbon or
flannel binding, and after the skirt has been added, sew on strings at C C C,
about three inches from the edge, and the other side at the edge at D D D. This
allows the body to wrap over in front. The back breadth of the skirt of the
flannel is gored away each side to six and a half inches at the top - the half
being allowed for the skirt seam - and the front breadth to nine and a half
inches. The front breadth is split open down the centre. The two breadths of
flannel are run and felled together before this slit is made. Next bind it all
round, waist and all, then sew the waist of the flannel to the waist of the
body. Tie the skirt together, with ends of ribbon sewn on for the purpose.
Flannel can be bought with the edge worked with coloured silk to use for babies'
clothing.
The cape of the baby's cloak must also be used alone where the child is
short-coated. Most likely the entire cloak will require remaking and cleaning
for a new baby, and therefore it is well to wear out the cape in this manner.
Short frocks, or, as they are called, three-quarter frocks, which are first
used for babies, measure about half a yard long in the skirt, and are added to
eight-inch deep bodies. After a month or two, a few more tucks are run in these
skirts, to enable the child to walk freely. The "short coat" of a delicate
infant should be five-eighths long in the skirt in cold weather; and their
reduction in length should be very gradual.
Plain muslin frocks neatly hemmed are quite sufficient for short frocks, but
where it is desired to have them handsomer in appearance, they may be made like
long frocks as regards the embroidery.
Both for the three-quarter dresses and the quite short ones, many mothers
use pretty light fine-printed cambrics or white piqué ; or, in winter, merino or
plaid. All babies frocks are now completely gored on both sides of the front
breadth, which is set into the body perfectly plain at the waist. The back
breadth may be plain and set into the waist gathered. Two widths generally
suffice to form an infant's dress, but should more be employed the side one
would also be sloped away in the seams toward the front.
A very handsome frock for a baby may be made of muslin, the gored front
breadths made of rows of machine tucks upright, and placed between bars of
embroidered insertion. This entablier front, as it is called, is edged
all round with insertion, outside which there is a robing of vandyked work, also
carried all round, and forming a robing continued from the braces on the body.
These braces go straight across the back of the body like a berthe, as shown in
Fig. 51. The back of the body is simply plain, a little full, and drawn slightly
at the neck and waist into the worked bands. It is a plain unsloped piece of
muslin. All round the hem of the skirt there is a deep embroidered flounce. The
front of this dress is shown in the illustration marked Fig. 50. A frock made of
very fine Swiss muslin, with Swiss muslin or lace trimmings, is an elegant
dress, either run with blue ribbon under every part of the insertion or worn
over a blue sarcenet slip. A sash can be tied behind of pinked-out blue gros
grains, bows to correspond should tie up the shoulders, and silk or fine
thread lace socks and blue silk quilted shoes cover the little feet. Silk
quilted shoes are very soft, comfortable, and pretty for a baby's best wear up
to a year and a half old.
Winter frocks for children short-coated are exceedingly pretty made of
plaid. The Rob Roy--that is, scarlet and black ; the Robertson, also scarlet and
black, dice of scarlet and white; and the scarlet Stuart plaid, are particularly
appropriate for children. So is the dress Stuart, the scarlet plaid, in which a
little green, yellow, and black is mixed, mounted on a white ground. Fig. 52
illustrates a pretty way of making a boys frock of this plaid. A yard and a half
makes a child's frock. Cut the body and sleeves first, using about a quarter of
a yard for the purpose; fold the rest in half.. The front width is gored on both
sides to about eight inches across the waist. For a boy's frock gore a little
off each side of the back also, but not for a girl's frock. Cut the front
breadth in half where the slanting pattern is observed. Mitre one side and bind
it with black ribbon, velvet, or braid. Bind the under edge straight, to prevent
its fraying. Sew the mitred edge about an inch over the other, and put a small
black or a gilt button in every scollop. The mitres continue up the body. The
body is piped at the top and the mitres added. The sleeves are plain, and mitred
bands are laid round them with lappet ends behind, as shown in the figure. The
belt is mitred, and so is the sash of two short ends and four bows and a knot.
The edge of the skirt is merely hemmed. Lace must be tacked round the top and
sleeves of this and all coloured frocks.
Fig. 53 is suitable for a girl or boy. It may be made of cambric or very
fine mull-muslin. The tucks on the body are very fine: the sleeves are a
straight piece of muslin, which is tucked before it is cut into shape. The skirt
has a deep hem, and from eight to ten small tucks above it. The neck and sleeves
are finished, with lace or edging.
Fig. 48 is a baby girl's short frock. The tunic and lower part of the bodice
can be made of plaid, and the rest of the frock of plain cashmere. It is also
pretty if with the tunic and corset of grey cashmere and the petticoat and
bodice top of scarlet. The tunic is gored quite plain to the waist in front, and
slightly gored at the sides of the back, which is pleated at the waist. The edge
is mitred and bound with black braid. The petticoat is only a piece put on under
the mitres of either plain scarlet cashmere or with upright small pleatings. The
top of the body and sleeves are scarlet, plain, or pleated, according to the
petticoat. For a dress frock blue llama over white alpaca is very pretty, and
the alpaca petticoat trimmed with two rows of blue ribbon. Instead of the mitred
edge two rows of white ribbon can be used to trim the tunic, or instead of two
plain rows a twisted row, like Fig. 49. The tunic must of course correspond with
the petticoat in the style of trimming, only blue trimming is laid on the white,
and white on the blue.
In winter, children from the time they are short-coated generally wear a
pelisse made exactly like a frock with a high body and long sleeves, and a cape
and collar of the same material. The capes are deep, and reach below the waist.
Black velveteen, grey or blue merino, are very suitable for such a purpose. Trim
velveteen with a broad military braid and a narrow one of the same colour as the
pelisse, and a row of buttons down the front. Merino pelisses look best when
trimmed with quilted silk of the same colour; but many people use white worsted
braid [-179-] for such a purpose. In very cold
weather the pelisse can be worn over the frock, which is generally removed.
The modern fashion of pelisses, such as we have described, made in velveteen
of various colours (dark rich ones being preferable to lighter tints, and more
suitable, especially in London, for winter use), and handsomely trimmed with
fur, is an excellent one, and is a style likely - to return frequently to
fashion. These fur borderings can be obtained at all prices and widths; and will
be found to contribute additional warmth. It must ever be remembered, in the
clothing of an infant that, while the pressure of heavy cumbrous clothing is to
be avoided, as oppressive and fatiguing both to the child and the nurse who
carries it, still, as long as it can take no sort of exercise, the blood
circulates but feebly, and the heart being weak in its action, the vital heat
must be kept up, both by warm food, and warm, though light, clothing.
Ruby velveteen trimmed with grey imitation Chinchilla fur is a very handsome
mixture. To match the pelisse,: the head-dress for a girl is a little drawn
bonnet of the same material, edged with the fur; while for a boy a little round
cap or hat is suitable-the shape for which may be purchased at any milliner's -
covered at home with the velveteen, and trimmed round the brim with fur, like
the bonnet.
Little out-of-door boots, trimmed in the same style with fur, are much to be
recommended, and are very easily prepared for use by a skilful mother or nurse.
Black velveteen frocks for wearing in the house may be ornamented, with white
embroidery laid on beneath the hems, and encircling the neck of the dress and
sleeves, instead of fur. The embroidery can be taken off and' washed frequently,
when soiled, as it wears well; and it looks charmingly fresh and pretty. If the
work be rather deeply vandyked it is necessary to tack down the points to the
dress, which can be done without any chance of tearing it if the embroidery be
not put on too tightly and scantily. Otherwise, the points of the work will
turn up at once, and will have the appearance of being soiled when really clean.
With these little dresses silver buttons may be suitably worn.
[-236-]
CHILDREN'S DRESS. - V.
CHILDREN'S CLOTHING (continued from p. 179).
WHEN the babe is short-coated it may either wear the little chemises it
already has, joined up the back, or have a set of six new ones, made in fine
cambric muslin, ten inches wide (doubled), allowing another half inch for the
seams at the side. This is cut like Fig. 66,ten inches long, allowing another
half inch for hems. Fold the muslin, so as to have it double on the shoulders at
A A. Cut the slanting lines close beside the A A's which divide the shoulders
from the flaps. Cut the flaps apart, and hem them and the shoulders all round,
button-holing the corners. But the seams should first be sewn and felled with
very fine cotton. The bottom may then be hemmed round a quarter of an inch deep.
Make the sleeves, cutting them like Fig. 61, six and a half inches long, the
straight side. Sew together at B and C. Then turn down and stitch the straight
side, and sew and fell the other side into the chemise. At the corners of the
flaps marked E and E sew on strings, which are tied under the arm, the strings
of the front to those at the back. A button is placed on the sleeve, and a
button-hole for it is made at the point of the shoulder. This fastens over the
little one's many shoulder-straps, and keeps them neat. Edge the sleeves with
Valenciennes lace. Fig. 61 is a design for the chemise sleeve, to be made seven
inches long.

The short-coat stay body is illustrated by Fig. 63. It is
made of fine jean or of stout fine linen, faced with twilled muslin, and quilted
: with a machine this is easy to do. The size is five inches deep and twenty-two
long. It is then bound all round. The shoulder-straps are of the same material,
a quarter of an inch wide and about four inches long, quilted and bound all
round. They are sewn to the back and secured by a button in front. The little
flannel petticoat is generally plaited at the waist and sews on the body. The
breadth of flannel is sufficient ; the length, guided by the size of the child,
should be an inch less than the white petticoat. The prettiest flannels for
infants are those sold by the yard, scalloped and embroidered in blue or
scarlet.
Further on we give full details for making a flannel'
petticoat, which, with the exception that it is longer, is the same as the
baby's.
We now pass on to clothing for children of two or three years
old. The directions are equally applicable for those of a year and upwards, but
are a little longer and larger, perhaps. First of all, for children of both
sexes little flannel jackets of fine Welsh flannel are needed. The shape
resembles Fig. 68, measuring eleven inches and a half (double) under the arms
from A to A, and thirteen at the bottom from B to B. The length is nine inches.
It is well, however, to make it three or four inches longer and three inches
wider (double) each side. We measure from one which has been worn some time, and
consequently shrunk.
Run and fell the side seams from A to B, and the shoulder
seams. Hem the top and bottom narrow, and also the armholes. When the shoulders
wear out cut them away, and put broad tape straps an inch wide. Never use narrow
straps for children, because they drag and cut the skin. It is well to have four
flannels, for children often need a change, and these little things do not cut
into much stuff. They should be worn all the year round, for they are even more
needed in summer than winter.
Next make six chemises. Very fine longcloth is generally used
for such young children ; a shilling a yard is not too much to give. Some
persons lay out one shilling and sixpence on it. Half a yard is more than
sufficient for one. Two yards and a half of thirty-two
[-237-] inches wide longcloth (actual measure) will make six. Each one is
fifteen and a half inches long, and sixteen wide at the bottom. Cut the shape
like Fig. 72, that is, in the same way at the top as the short-coating chemise,
but a little more sloped at the waist. The sleeves, too, are cut as before, but
measure eight inches long when cut out like Fig. 61, which, of course, is
double, and is reduced to four before it is inserted in the form of a sleeve.
The apparent gaps between the shoulders and flaps are only the result of the
narrow hem. Run and fell the side seams, A to B, and hem the bottom half an inch
wide. Run and fell the sleeve together, and also into the armhole. Turn down and
stitch the edge of the sleeve and trim it with lace - a good but fine tape-lace
serves the purpose. Our readers must not confound the tape-lace with tape
trimming, which is quite another thing. Tape trimmings are very pretty to look
at, but do not get up easily.

Figure 69 shows the shape of a shirt for a little boy of the
same age; it takes the same quantity of material as the girl's chemise; it is
sixteen inches wide all the way down. Cut it with the longcloth double on the
shoulders, A A; leave the sides open as far as B B (three inches and
three-quarters or four inches) ; run and fell the rest of the seam to D D, and
leave it open again from D D to C C at each side. Let in a little three-cornered
gusset at F, each side (E to F shows the side of the shirt). The gusset is
double, run and felled in very narrowly and neatly, and stitched across the
double edge, where a line may be noticed; then hem very neatly, and as narrowly
as possible, each side of the open seam from n to F; afterwards hem the bottom
of the shirt half an inch wide. Hem round the flaps and shoulders very fine,
button-hole the corners, and sew on tapes long enough to tie under the arms. Do
not tie these so as to confine the garment to the child, but loosely, merely to
keep down the flaps. Tapes are sewn on quite half an inch down the flap, hemming
both sides all the way to the edge. The armhole of the shirt must next be
finished : - Take a strip of long. cloth, cut down, not across, the material, two
inches wide put it on the sleeve inside at the dotted line, A to B and E, in
Fig. 69, running it first to the edge of the hole, turning it over, and hemming
it down finely ; afterwards stitch the edge of the armhole marked by the dotted
line, A to B, on the other side of the diagram, Fig. 69. Small children may not
need such large armholes or sleeves, and three inches doubled or six long in the
cutting will suffice.
The next thing is the stay body, which may be made alike for
boys and girls. The bodice is generally seven or eight inches deep and
twenty-four long, and the backs wrap over ; some children, however, are small,
and do not take them larger than the short coat bodies, five inches deep and
twenty-two long. These are made of jean, lined with soft linen, and run together
the short way with cords. Tack jean and linen together, when cut out, all round
with coloured cotton, and then tack the places to be run between the cords with
another colour; pull out the first coloured cotton, that fixes jean and linen
together, as it is not now needed, and is in the way of running the cords
between the tacking. Put in the first cord with a bodkin; finely run with white
cotton over the tacking; put in another cord, and run the next line, and so on
till all the cord is in; then cut it even at the edges and bind the body all
round with twilled binding. Make the straps half an inch wide, of jean and
linen, bound, and sew them on. There are various ways of running the bodies.
Fig. 64 is regularly corded close together; Fig. 57 in alternate groups of three
cords and a space. Either tapes or buttons may be used to fasten the body, but
tapes are best, as other buttons must be sewn on, as shown by four A's, both in
Figs. 64 and 57. The lower and smaller row of these is for the drawers; the
upper for the flannel petticoat. When the drawers or petticoat are new and full
long, place these buttons higher up; as the garments get short for the child,
[-238-] lower the buttons. The petticoat is buttoned on higher up than
the drawers.
Cut the drawers from Fig. 70. Each leg is cut separately,
measuring four and a half inches across, from D to D (doubled, or nine inches
open), five inches and three-quarters, or six inches, from E to E (doubled), and
four inches (doubled) from F to F, sixteen and a half long from D to F, nine
inches from D to G, and on to E. Run and fell each leg together on the sloped
side, from E to F ; then join them together down three-fourths of the length of
the front, leaving the rest of the front and all of the back open, hemmed each
side as narrow as possible. Cut open the sides from D to H and hem them
narrowly, putting in a little gusset at the corner. Make a hem and four tucks,
each a quarter of an inch wide, with scarcely any space between ; then set the
front, in a band twelve and a half inches long, the half inch to be turned in at
the ends, and two inches wide, the half inch to make the two turnings. To do
this pin the top of the drawers to one edge of the band, run together, fulling
it a little to get it in; then turn down the opposite edge of the band, turn it
over and pin down on the wrong side of the drawers, turning in the ends also ;
hem it neatly down, and sew the edges. Cut two bands, each six and a half inches
long and two wide ; run and hem them on to the two halves of the back, in the
same way as with the front band ; make large button-holes at seven places, to
fasten the drawers to the stay bodice. Stout children may require the drawers
longer in the body from the slanting line, D to E, in Fig. 70, or only longer at
the back ; in either case the back only, or both pieces, are cut by the dotted
line, D to as, in Fig. 70, which slopes upward. If they are wanted wider, the
width must be allowed from D to D and E to E; and the leg also, F to F, it will
be well to increase in proportion. This may be done by taking the sloping and
curved lines on one side of the leg, D to E and E to F, an inch or an inch and a
half longer (doubled).
The flannel petticoat is the next article of clothing. This
should measure nine or ten inches long made up, allowing two inches for a tuck
and one for a hem, that is, twelve inches in all. It is well to make a new one
with two tucks, or fourteen inches long. One width of flannel suffices. Run and
fell the back together, Fig. 56, half way up ; make a wide hem on one side and a
narrow one on the other for the rest of the seam, folding the wide one over the
other, and stitching it down across at A. Make an inch-wide hem and then one or
two tucks, according as the material has been allowed. The child's waist, over
the stay bodice, must be measured, and the shirt box-plaited into a two-inch
wide band, half an inch of which is allowed for turnings. Five button-holes are
made in the band at the five B's in Figs. 56 and 58, which also show the
plaiting. There is one button-hole in the centre in front, one exactly over each
hip, and two at the two ends behind ; these last two are fastened on the one
button at the back. A yard and three-quarters of fine Welsh flannel is
sufficient to make four flannel shirts, which will be needed. It must be sloped
a little in front before setting it into the band.
The next items in the child's wardrobe are its white
petticoats. Two widths of longcloth, of a fine quality, measuring thirty-seven
inches long, will be required. The exact width of the long-cloth to an inch does
not signify, but it should not be much wider. The length of the skirt is ten
inches. To each breadth allowance must be made for the width of the hem ; for a
half-inch hem, half an inch ; a half-inch tuck an inch, because the tuck is
double. The simplest way to make the skirt is with a hem and three tucks, each
an inch wide. That, with the turning in of the hem and at the top, makes
eighteen inches, or half a yard ; that is, a yard for each skirt; half a yard
for the body and sleeves will probably be sufficient. Either run and fell, or
sew the skirt seams together. Far tucks, sewing is the neatest and best. Make
the hem and tucks with half an inch space between each. Cut open a slit down the
back for the placket-hole, half the length of the skirt. Make a broad and a
narrow hem on the respective sides, as shown in Fig. 62. Stitch the broad over
the narrow where they meet at A. Petticoats may be made with a number of narrow
tucks, like Fig. 65, and three narrow and a broad one alternately, for variety.
Sew the gathers larger at the back and closer, and finest of all and plainest in
front. Over the hips they are between the two in size and fulness. They are sewn
to the body, after being first pinned to it. To make the body, cut the fronts
and two backs like Fig. 67 - From A to B the body measures six inches.
To make the size of the body more easily intelligible, we
give the following instructions : draw an oblong on paper, measuring nine and a
half inches wide, by twelve long, G G G G. From C to H, down the centre, there
is a space of three inches; measure and mark this with a large dot. The
shoulders rise to the top. It is easy to draw the undulating line thus assisted.
From the side at D to the line E there is a space of an inch. Dot it, and get
the curve of the waist. From G G to I I, under the arm, the length is five
inches. The backs are cut from first drawing the oblong of nine and a half
inches high, and six and a half inches wide. The slope at the neck is two and a
half inches, the shoulder meeting the top line G. Draw the slope at the waist;
the back measures five inches under the arm, and five and a half at the back.
Having drawn these pictures on paper, cut them out, and the longcloth by them.
Both backs are alike, but reversed, lefts and rights, as with shoes and gloves.
In longcloth, which has no right or wrong side, this does not matter. Run and
fell the side seams and shoulders of the body together. Hem the back an inch
wide. Hem the top and waist each half an inch wide, and run strings to draw in
both. A few buttons should be placed up the back also. The sleeve, Fig. 59, is
eight- and a quarter inches long and two inches and a half wide in the broadest
part, and two inches at the narrowest. Run and fell it together underneath, run
and fell it into the armhole, using a quarter of an inch for this purpose, and
make a hem at the edge, a quarter of an inch wide, and edge it with narrow work
or lace. Be sure in cutting the body not to shape the armholes too large. They
can always be increased from every side but the shoulder, which must not be made
too narrow. An inch should be allowed in cutting for the shoulder width, one
quarter to fell to the sleeve, one quarter to turn down for the hem, one quarter
for the inner turn of the hem, and a quarter left for the strap when completed.
The quantities for turning were allowed in the measurement given in Fig. 67 and
Fig. 69. Fig. 60 shows the sleeve ready to be felled in. A in Fig. 71
illustrates the manner of putting in the sleeve. The right side of the sleeve is
outwards, and put in at the right side of the body, as it would be if worn. But
it is run and afterwards felled from the back, according to the diagram at A.
[-291-]
CHILDREN'S DRESS. - VI.
CHILDREN'S CLOTHING (continued from p. 238)
THE best out-door dress for a child two years to four years old is a pelisse
and cape. In winter it is warm and comfortable, and it always has this advantage
- if a child makes its frock dirty in the house, the pelisse is fresh and clean
for out of doors. In very cold weather it is put on over the frock, or frock and
pinafore ; in warmer weather the frock is removed. In winter, serge or merino or
velveteen are good substances for pelisses ; in spring, fancy mixtures of wool
and cotton ; and in summer, pretty prints, brown holland, plain linen, and
checked muslin and white
piqué.
To take a pattern for a child's pelisse and dress.
To cut a Cape.- Take a small newspaper, as it lies,
folded in four. We assume it to measure twelve and a half inches long from A to
B, Fig. 74. Fold the corner B back to C. The fold will come at the dotted line A
to D. Cut the paper at the dotted line from D to C. Turn the paper over and cut
another piece like the first, or, rather, continue the cut from D to C along the
back of the paper, as shown in Fig. 75, at the dotted line a to F. You have now
two squares in one, marked G and H in Fig. 75. Fold these exactly together, as
at Fig. 86, one square; fold again i to j, at the dotted line K to L. The piece
of paper is now the shape of Fig. 87. Cut it with a slight circular slope from o
to P and M to N, taking care that it is as long from o to m as from P to N. Then
open it and it will resemble a half-circle (Fig. 73). It may be bolded in half
again, and sloped by the slanting line shown by dots at A and a from the centre
[-292-] S very slightly. The pattern is, of course,
much smaller than a child's cape, but it instructs the mother how to cut a cape.
She can afterwards easily cut one any size desired.
The Pelisse.- The cape of a pelisse should half cover the
skirt, and, indeed, be an inch over the half-measure at the centre behind. The
length of the pelisse must be determined by the size of the child, and the cape
by the pelisse. The pelisse for an infant in arms should be made long enough to
cover the feet, and just touch the ground. If the child walks, it should come
half-way between the sock and the top of the boot, which it will do when worn if
the measure be taken

and leaving half an inch at top and bottom to pipe and to turn in on the
shoulder and side. Put pins in the material along the edge of the paper pattern,
to indicate how much is allowed to turn in. For the fronts, allow an inch at the
side and shoulder. Allow nothing where the material is doubled. Allow half an
inch at top and bottom and round the arm-hole. Cut the body on the straight of
the stuff - that is, the sides level with the selvage ; the width of this is to
be taken the narrow way of the stuff - that is, with the selvage on a level with
H and I, Fig. 76.
To make a frock body, cut paper pattern first from the one like Fig. 76, and
then mark the dotted line at H in Fig. 83 on it, and cut it across there. This
makes it a low body, and will serve for a petticoat or frock. All bodies are
best cut as directed, with the stuff double, backs as well as fronts.
To cut the sleeve, Fig. 78, measure the length of the outside of the arm.
Mark it on a piece of paper from E to F. Measure the length of the inside of the
arm. The length outside is measured from the arm-hole in the frock behind, with
the arm bent, and the inside from the arm-hole in front, with the arm straight.
The inside measure is an inch or two shorter than the outside. Mark the inside
length on the paper from C to D, Fig. 78, allowing equal space to each end.
Measure the arm loosely at the top. Mark half the size round from C to E.
Measure the wrist large enough for the hand to slip through easily. Take half of
this and measure from D, sloping it as low as F, Fig. 78. Make a dot for the
elbow exactly halfway down the pattern, at G. Then draw a curved line
[-293-] (like the dotted line in Fig. 78) from E to F, a well-rounded
line from C to E, and a straight line from D to F. Cut out the pattern as you
have drawn it. Cut two pieces alike for each sleeve, doubling the stuff first,
or else taking care to reverse the pattern. Sleeves like this are cut straight -
down the material - as it is called ; the selvage is level with C and D on the
straight side. The shape of the curve at the outside makes that part of the
sleeve in effect on the cross, although the inner side is straight and level
with the selvage. This is shape enough
for a young child's sleeve. Allow half an inch in cutting all round the paper
pattern. Take the dotted line K for a pattern for a short sleeve for a frock or
petticoat. If the petticoat be first cut from this pattern, cut the body and
sleeves of the dress a little wider - a quarter of an inch on each side. Short
sleeves are not cut in two pieces like the long ones, but in one, at the side E,
and joined once at the side C.
Measure the child to cut the skirt. Allow half an inch for gathers. The hem
had better be two inches deep, therefore allow two and a half for it, as it has
a turning-in. A tuck is advisable in a growing child's skirt. As a tuck is
double, allow double the depth. Four inches is wanted for a two-inch tuck, which
is best with a two-inch wide hem. A skirt for a child
of two should not measure less than two yards round. Often three yards is
allowed.
To make up the Pelisse. - Cut a lining of thin calico, the same size
as the pieces of the body and sleeves. Tack each piece of the body and sleeves
to the lining, half an inch in from the edge. To do this, lay the material on
the lining, using a rather large needle charged with a long thread of very fine
white cotton, such as you would use to mend lace. Tack the
body and sleeves together at the places marked by the pins for turning in, and
try them on. Then stitch together the sides and shoulders neatly with cotton the
same colour as the material. Pipings are cut from the material on the cross and
first run. When the backs we hemmed, run a piping round the neck, waist, and
arm-holes of the body. Run the piping on the right side, the cord downwards,
half an inch in. This is afterwards turned down at the back and hemmed. It is
neater, however, to run a narrow white ribbon (or twilled tape) on after the
piping, still on the right side, and then turn down piping and ribbon. If the
ends of the piping are too wide, cut them away, and run down the ribbon to the
body on the wrong side. The pipings round the armhole must not have the ribbon
run on, nor yet be turned down and hemmed. The sleeves are stitched in, and the
ends cut away close and overcast. Stitch the sleeves together first, and pipe
the cuffs, turning them down with the ribbon. Overcast the sleeves.
To put the sleeve into the arm-hole, fix the seam of the sleeve quite an
inch behind the shoulder-seam of the body.
The skirt is not generally lined. Hem the bottom, and make the tuck if there is
one. For a trimmed pelisse there had better be a deep hem. Cut a slit in the
centre of the breadth behind for a placket hole ; hem one side inch-wide, the
other quite narrow. Fold the broad over the narrow hem, and stitch the fold
across at the bottom. When the trimming is on, turn down half an inch at the top
of the skirt, and pleat it in small pleats, turning towards the front, and
beginning two inches apart, in front ; these pleats are closer and larger
towards the back.
The cape must be lined with fine cambric muslin, or twilled muslin, to match
it in colour. Cut it out from the same pattern, and tack it to the cape when
trimmed, both lining and material face to face, and the wrong sides outwards.
Run them nicely together half an inch in. Take out the tacking threads and turn.
The cape is run all round the edges and sides, the throat only left. It is
turned through the opening at the throat. Tack it together all round again. If
the cape is to be faced with silk, cut the silk the shape of the dotted line T
in Fig. 73; run the edge next T on the wrong side of the silk to the right side
of the lining; turn it over and tack it down before tacking the whole of the
lining to the material. Cut a small collar, and also line it after it is
trimmed. Turn the lining as the cape lining was turned. Run the neck of the
collar to the material of the cape, not taking up the lining. Then turn in as
much of the lining of the cape as you have run into the collar of the material
(about half an inch), and hem it neatly to the collar, taking care the stitches
do not come through.
The Trimming. - The trimming is put on the cape and collar before they
are lined ; on the cuffs of the sleeves before the straight or under seam is
closed so that the ends may be turned in; on the skirt it is set before the
pleats are made. Lay the cape, &c., flat on a table, and tack the trimming
first, not pulling it tight, but letting it go easy. Lay the trimming down on
the material, and tack it ; lastly, run it on neatly, taking a back stitch every
time the needle is inserted afresh. The skirt may be either trimmed before the
last seam is run up - leaving the ends of the hem open an inch each way, and
closing them after - or half the skirt can be laid on the table, the trimming
tacked, then turned, and the other half tacked. In that case, open the seam, and
let in the ends of the braid or velvet. Fringes and muslin edges are put on
last, when the cape is lined.
Capes of muslin or piqué are not lined, but piped at the edge, and the
pipings hemmed down. Some of the piqu'd ones, with muslin-worked edges, have the
muslin hemmed down over the pipings ; others are cut rather close, left loose,
and overcast neatly. This stiffens out the embroidered edge well. Piqué is piped
with cambric muslin.
[-294-] Crimson, bright blue, and violet
cashmere pelisses are pretty for children, trimmed with one straight deep row of
velvet ribbon, or one deep and one narrow above the hem of the skirt, round the
cape, collar, and cuffs. An edging of piece velvet round the cape and collar
makes a handsome trimming to a cashmere pelisse, but is more difficult to put
on. It is cut on the cross, shaped to the slope of the cape, and joined in
breadths, and run on the wrong side and turned over on the cape, and tacked down
before the lining is added. There is then no trimming on the skirt, which may
have a tuck if plain. Sable, chinchilla, or quilted silk make pretty edges for
capes for children in winter.
For a costly toilette, a silk velvet pelisse is handsome, either black, dark
blue, or dark green. In winter, a narrow tip edge of sable, chinchilla, or a
band of ermine or minever, is appropriate. For any time of year, nothing can be
handsomer than a rich wide lace on the cape and collar, and robing the sides or
round the hem of the skirt.
Brown holland pelisses look well with capes edged by embroidery. Plain linen
pelisses can be merely trimmed with embroidery, or embroidered in crewels. White
piqués are now braided in elaborate patterns, and trimmed with embroidered
edges. A neat and pretty and easy way is to place a narrow ornamental braid on
.t cape like herring-bone, wide enough apart to admit a ribbon an inch wide
through it, which can be removed to be washed (see Fig. 82). Checked thick
muslins and sprigged Swiss muslins are pretty for summer. The checked may merely
be trimmed on the cape with an embroidered edge, or have an insertion let in,
run with coloured ribbon, and be worn with a sash, the hat or bonnet
corresponding in colour.
Little children of two years old wear velvet hats bordered with fur - a plain
buckram shape of the turban or "pork pie" make, covered with a piece of velvet
hemmed to the crown, the edges turned down in reversed pleats round the brim and
inside. Tack it down with small stitches that are not seen on the right side,
and long ones inside. Line it with silk, run on the wrong side over the tacking
stitches, and then turned over and into the crown. Little girls wear bonnets
like hoods. The Marie Antoinette shape is pretty, made in quilted white or
coloured silk or satin, edged with a narrow scanty ruche of ribbon, and a ribbon
bow or rosette on one side. In summer, straw hats may be used for boys, with a
band of blue ribbon.
There are many mothers who prefer jackets to pelisses. Fig. 91 is a jacket
of white pique or brown holland, suitable for a child from two to three years
old.
Pinafores are made various ways. A piece of diaper may be folded in
half, lengthwise, and then in half again lengthwise, taking from the second
folds a slope off the top at A (Fig. 81) for the shoulders to be run and felled
together, and a circular slope at a to form an arm-hole and epaulette with the
narrowest hem possible, the epaulette edged with muslin work ; at the top a wide
hem and a string to draw, a hem at the sides and bottom, and a second pair of
strings at C, complete it. Fig. 79 shows another way of cutting a pinafore. The
slope on the shoulders can be made, but the pinafore looks quite as well without
it. The arm-hole is cut and hemmed round ; the front is gathered on to a band at
D, shown better in Fig. 85, with ends to tie behind. Brown holland braided is
pretty. Many children wear pinafores which are really little frocks; for girls a
skirt and body, for boys a plain piece of holland wide enough to go round them
over their clothing, is sloped over the shoulders like A in Fig. 81, and then
the whole of the front set in three box pleats, and the whole of the back in
three box pleats at the top, sloped a little for the neck, and set in a narrow
band,. Arm-holes are cut, and the rest left loose. Epaulettes are set in the top
halves of the arm-holes, and the rest hemmed narrow. The opening of the pinafore
is behind, between the second and third pleat. The skirt has a deep hem. A
two-inch broad belt, with a button behind, is put on over the pinafore, but
separate. For a girl of three, a book-muslin pinafore, trimmed with Valenciennes
lace and embroidery, with a tucked skirt and bib-shaped top, is very pretty for
evening dress (see Fig. 88). A low frock, for a child of two, may be seen in
Fig. 90. Fig. 92 shows an out-of-door jacket for a boy of three years old. Fig.
89 is a pinafore for a child of three years old and upwards. Fig. 80 is a
knitted jacket, likewise for a child of the age just named. For this jacket the
materials required are:- 2 - oz. of white single Berlin wool, or 3-thread
fleecy, - oz. black single Berlin, and the same quantity of dead gold, blue,
ponceau, or any colour preferred for the border, a skein of white filoselle, and
five needles, No. 12. This jacket is knitted in white wool, and trimmed with the
other colours. It is worked the long way (not across) entirely in plain
knitting, and as the rows go backwards and forwards, they look alternately plain
and purl, and give a ribbed appearance to the work. It is commenced at the
straight edge of the front by casting on seventy-two stitches, and the first
fifty rows are knitted plain, always taking off the first stitch, which will
give twenty-five ribbed or purl rows on each side of the work. In the following
nine ribs (a rib includes two rows), viz., in the 51st, 53rd, 55th, 57th, 59th,
61st, 63rd, 65th, and 67th rows, an increase must be made in the last stitch but
one, by knitting it twice, first from the front as usual, and then from the back
before taking it off the needle ; this increase is for the rise from the neck to
the shoulder. In the 68th row there should be eighty-one stitches.
[-332-]
CHILDREN'S DRESS. - VII.
CHILDREN'S CLOTHING (continued from p. 294).
Nightgowns. - These should be made as simple as
possible for little children. Take a plain breadth of calico at eightpence a
yard, long enough for the child. Run and fell it together behind, leaving a
placket-hole which must be hemmed. Double it in half, and double again to find
the shoulders. Take a slope off; cut a straight slip in the side for the sleeves
to be put in. The placket-hole should be open enough. Run and fell the shoulders
; scope out the neck a little in front; set it in a band three-quarters high ;
make the sleeves of straight pieces as long as the rows and moderately wide; run
and fell them together. Run and fell the top into the arm-hole, and set the cuff
into a band that will slip over the child's wrist ; then run a string round the
top band; the bottom having been previously hemmed. The nightgown may be worn
this way, or it may be gathered into a band sewn on at the waist in front as far
as the arms, and lined with a similar band on the wrong side. The band in front
is in one, with a pair of strings piped and lined, that button or tie behind,
but quite loosely, Fig. 99. In winter, a flannel gown is desirable for so young
a child, made the same way, of Welsh flannel. If desired, the neck and wrists of
the child's gown may be edged with embroidered work,; but it is quite
unnecessary. A child should have half a dozen longcloth nightgowns, and four
flannel ones, as they require frequent changes. Fig. 99 shows the gown made to
button on one side.
Fig. 98 is a summer dress. There is first a fine Swiss muslin
skirt, with a number of minute tucks edged with a deep embroidery. A sash should
be worn with this, with a large bow behind. The body and sleeves are plain. The
berthe sets out nicely over the sleeves, and is made with three rows of tucks
and spaces alternately. It is edged with embroidery and so is the neck. There
are bows on the shoulders to match the sash. Fig. ioo shows the back of the
frock, and the sash.
CLOTHING FOR CHILDREN OF SIX YEARS.
For a little boy of six years old, cut a Shirt according
to Fig. 96 in shape, seventeen inches long and twenty wide (double). It is
similar in pattern to the one used at two years old, but larger ; the material
is double at the top, so as to form the shoulders. Cut the flaps at the mark at
A A, and cut the top of the shoulders straight, in the manner shown there ; the
three-cornered piece between the shoulder and the flap comes away entirely. The
dotted lines at B B show where pieces are applied on the wrong side to
strengthen the arm-holes. Two straight bands are cut - each two inches wide and
ten inches long - for this purpose, sewn to the edge of the shirt, and then
turned down, pinned flat, and neatly hemmed. The flaps must be cut apart at the
top, and hemmed round, as well as the edge of the shoulders. The seams should be
run and felled before the flaps are hemmed, and left open at the bottom as far
as C C. A gusset is inserted at each side at C C, and the open piece hemmed very
narrowly. A hem, half an inch deep, round the bottom completes the shirt.

Drawers for Boys are not only larger,
but vary from those used at an earlier age. Each leg is cut separately. The
material must be doubled on the straight side of the leg from A to B (Fig. 93),
and here it is eighteen inches long, allowing for a hem and three tucks. But we
recommend mothers, as children grow fast, to cut the drawers two inches longer,
and dispose of the additional length in a way we shall presently describe. The
measure, with the allowance made, is twenty inches from A to B, eleven from C to
D, eight and a half from B to E, eleven and a half from F to G, and fifteen and
a half from E to D. Run and fell the leg together from E to D. Round the end,
from B to E, make an inch wide hem, and above it, three-quarter inch tucks. Cut
a slit down the side from A to a. Make a quarter-inch wide hem on the front
side, and a very narrow one towards the back. Stitch the wide one across the
other. Make the other leg, and then run and fell them together from C to D,
going right round the other side from D to C. Lastly, set them in the bands, one
for the front and one for the back - the front thirteen and a half inches long,
the half inch to turn in ; and the back fourteen inches, one half inch of which
is turned in. Make a button-hole in each side of the front band, and one in the
middle (shown in Fig. 101, at A A A), but only at the two ends of the back. The
drawers are now completed. To shorten them for use, make a tuck near the top of
each leg, rather better than half an inch wide, at B B B B, and from C to C, on
both sides, rather less than half an inch wide. As the child grows. these tucks
can be let down, either entirely, or narrowed to make the drawers longer.
A Stay Bodice is the next article required. Measure the
[-333-]
size round of the child, just under the arms, taking the size very
loosely and easily; allow three or four inches over. Then measure the depth of
the body. Always cut your pattern first in paper, and then try it against the
child. If you have any old lining, it is a good plan to put the pattern next to
the lining, and fit it. The stay body, like all the other articles of a child's
clothing, should be easy. It is wrong ever to girt children in any part of the
figure. The stay body should wrap over about four inches, and tie, as shown in
Fig. 94, having a good shape cut in jean, and also in linen lining. There are no
turnings-in. Tack the jean and lining together flat, by the edges. Run three
piping cords across the centre ; leave an inch space, and run three more ; and
so on, till all the body is quilted. These cords are inserted the short way, as
Fig. 94 shows. A piece of stay binding is wanted, and should be stitched all
round. Cut straps for the shoulders, of jean, line them with linen, bind them
all round, and sew them to the body at the four A's in Fig. 94. The strings are
sewn in the way illustrated. In cutting the body, there is a slight curve or
stomacher in front, and a little sloped out over the hips, which makes the
petticoat sit better than if the body were straight, which gives it a bunchy
look about the waist. The neck is also hollowed front and back, but most in
front.

Make the Flannel Petticoat as before described. Take two
widths as long as the child requires, allowing two inches for the hem, and four
inches each for two tucks. Herringbone the seams nicely. Make the hem and the
tucks an inch apart., Cut a placket hole in the centre of the back- breadth,
half way down; herringbone a hem each side. Pleat the flannel at the waist ;
make a box pleat in front. The front of the flannel requires to be sloped as
much as the curve of the body. To do this, place anything across the body, from
B to C (Fig. 94), that will make a line exactly straight with the hips. Put a
pin where it comes, at D, and measure the distance from D to E. A thin child
will bear the flannel sloped equally with-this-measure; but a stout child has a
full stomach, and the slope may be half or three-quarters. It is best to pleat
the skirt before sloping, then pin it to the bodice, and try it on the child. It
will immediately be seen how much slope is needed.
In another place we shall have a word to say about the
washing of children's flannels, which is very important, and yet very little
understood.
The White Petticoat is now wanted. Rather stout calico
should be used for this. To cut the body, measure the child round easily under
the arms, round the waist, and round the shoulders. Write down these measures : -
Mark at the top of a square of paper a quarter of the size of the waist, across
the paper, like the line A in Fig. 97. Measure the child from under the arm to
the waist, and make a dot on the paper at B. Then mark on the paper a quarter of
the size round of the child under the arms, which will bring you about to the
dot c. You must then draw a line from A to C. Measure loosely round the top of
the child's arm. Say it is eight inches (it may be more), but take the half of
whatever it is, and pin it on a tape - measure. Suppose it is the eight inches,
put a pin at four inches in the tape ; lay the tape in a curve like a half
circle on your paper, and it will describe the mark from C to D. Take a quarter
the measure of the neck, and mark it by a dot at E. Then draw a line from D to
E. Make a sloping line from E to F for the neck, and from A to G at the waist.
Now cut out the paper; cut a lining from this. First pin the paper on the lining
; stick pins in the lining, all round the edge of the paper. Leave the pins in,
and cut the lining two inches wider, each way, at the sides. Then pin it
slightly together where the pins are, and try it on. The margin left is to allow
for alterations, if the pattern is incorrectly taken. This pattern will serve
also for frock bodies. To make a high body, it is only necessary to extend the
pattern, by taking the length of the shoulder from D to H, instead, of D to E,
and measure a quarter of the size of the throat from H to I. This pattern (Fig.
97) must be cut. out of double stuff, twofold in the material, coming from G to
I, as it represents only half a front, the waist at the top. For the backs,
allow an inch for each, to make a hem from G to I, if the stuff is folded
[-334-]
there to cut the backs. Having procured a satisfactory pattern, allow an inch at
the sides and shoulders, and half an inch at the neck, waist, and arm-hole, for
turnings. Tack the backs and fronts together by the sides and shoulders, an inch
in, and slip the bodice on to try it. If too high in the neck, long in the
waist, or tight in the arms (making due allowance for turnings-in), slip it with
the scissors, as shown by marks in Fig. 95, which represents the three pieces of
the bodice before joining. Hem the backs ; stitch the sides and shoulders. Run a
piping round the neck and waist, turn down, and 'hem them on the wrong side.
Pipe the arm-holes, and put in the sleeve. The skirt of the white petticoat must
be a little longer than the flannel, and should be ornamented with a narrow hem,
and a number of narrow tucks all of equal width. For every such, allow double
the width. Two breadths of longcloth are wanted. Run and fell these ; make the
hem and tucks. Make a placket-hole ; gather the waist, and sew it to the body.
Frocks for girls of this age may be made in a variety of
ways. Some like merino, pereale, or fancy stuff frocks,. according to the
season, thick or thin ; simply made like the petticoat - a broad hem and one or
two tucks in the skirt, and a low body, trimmed. Robe trimmings, covering body
and skirt, are pretty; or the body only may have braces, and a row of trimming
be placed straight round the head of each tuck. Many frocks are made without
tucks, but they are useful, because children grow so fast. When a dress has been
made without tucks, and the child grows out of it, the best method of
lengthening the skirt is to mitre, that is, regularly scallop the edge, and bind
it with braid. lithe frock is coloured, lengthen it with black ; if black, with
a colour. Scallop and bind the piece added, and hem it on above the scallops of
the frock, on the wrong side, so that the frock and scallops fall over the new
piece. The scallops of the one ought to be uniform with the scallops of the
other, and not to be arranged alternately.
[--grey numbers in brackets indicate page number,
(ie. where new page begins), ed.--]
|
source: Cassells Household Guide, c.1880s